

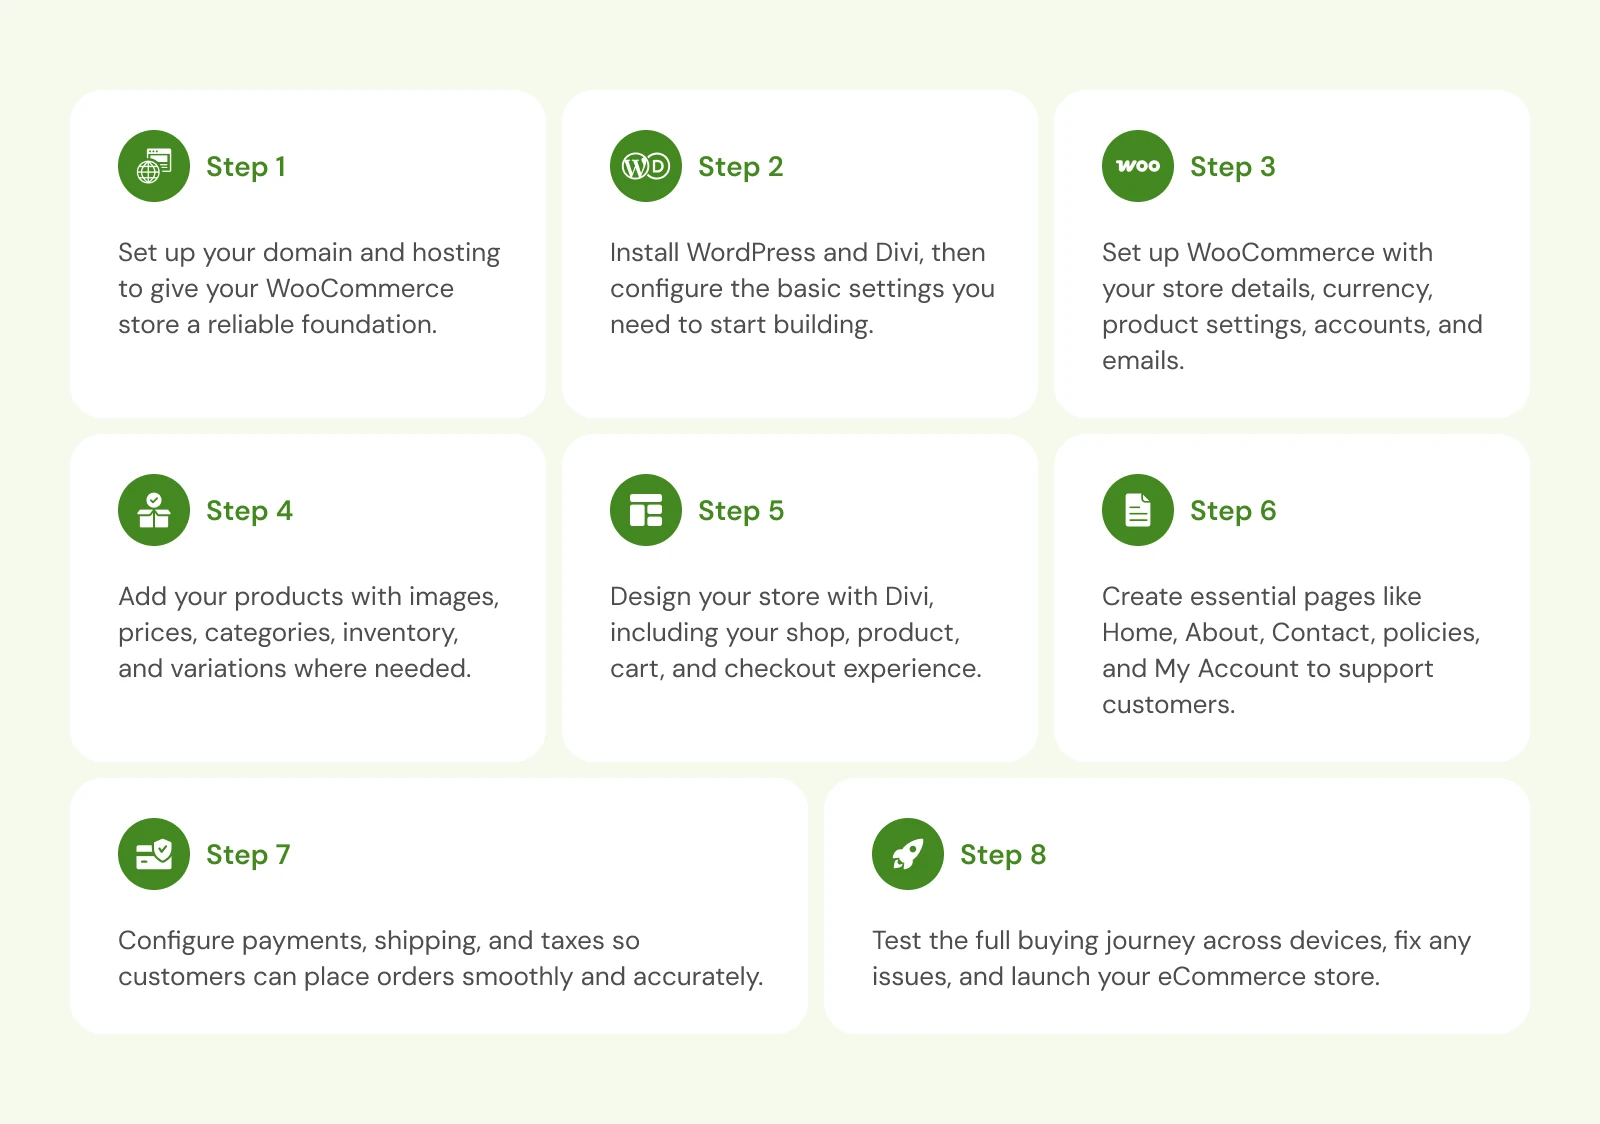
Start by setting up your domain, hosting, WordPress, and Divi settings. Then configure WooCommerce, add products, and design your Shop, Product, Cart, and Checkout pages with Divi.
To design your store, Divi gives you drag-and-drop building, 25 Woo modules, theme builder and more. You can also use a plugin like DiviMerc for more advanced customization options.
In this guide, we will show you how to build an eCommerce website with Divi and WooCommerce in 8 steps. This guide is beginner-friendly, but also useful for intermediate Divi users who want a practical setup-to-launch workflow.
Let’s get started.
Step 1: Set Up Your Domain and Hosting
Your domain and hosting are the foundation of your store, so set these up before installing WordPress.
Register a Domain Name
Your domain is the address people will use to find your store, such as yourstore.com. So whenever purchasing a domain name, try to keep it short and easy to remember. You can register one through providers like Namecheap.
Pick Hosting Suitable for WooCommerce
A WooCommerce store usually needs more server resources than a basic WordPress site because it has to handle products, carts, customer accounts, payments, inventory, and orders.
Therefore, when choosing a host, look for the following:
- WordPress and WooCommerce support can make setup and store-related troubleshooting easier.
- SSD or NVMe storage can help your site and database respond faster.
- Caching support can improve loading speed and reduce server load.
- SSL certificate helps keep customer data encrypted during login and checkout.
- Automatic backups give you a restore point if something goes wrong.
- CDN support can help pages load faster for visitors in different locations.
- Easy resource upgrades make it simpler to handle more traffic and orders as your store grows.
Common Mistake: Avoid cheap shared hosting for store sites. WooCommerce relies on real-time database queries, and slow servers cause slow checkouts, leading directly to lost sales.
Step 2: Install and Configure WordPress and Divi
Once your domain and hosting are ready, install WordPress.
Most hosting providers offer a one-click WordPress installer, which is the easiest option for beginners. You can also install WordPress manually if needed.
After installation, log in to your WordPress dashboard and make necessary changes by going to dashboard > Settings. There you can configure site title, tagline, URL, timezone, and more.
Install and Configure Divi Theme
Once you are done with the basic WordPress setup, the next step is to install and activate Divi. Here is how to do it:
- Purchase Divi from Elegant Themes and download the theme ZIP file.
- Go to Appearance > Themes > Add New Theme > Upload Theme.
- Upload the Divi ZIP file.
- Click Install Now, then Activate.
- Follow the Divi onboarding process to connect your Elegant Themes account and activate your license.
After activation, choose how you want to create your website.
You can build from scratch for full control, or use Divi Quick Sites to start with a pre-made Starter Site or generate a custom website with Divi AI.
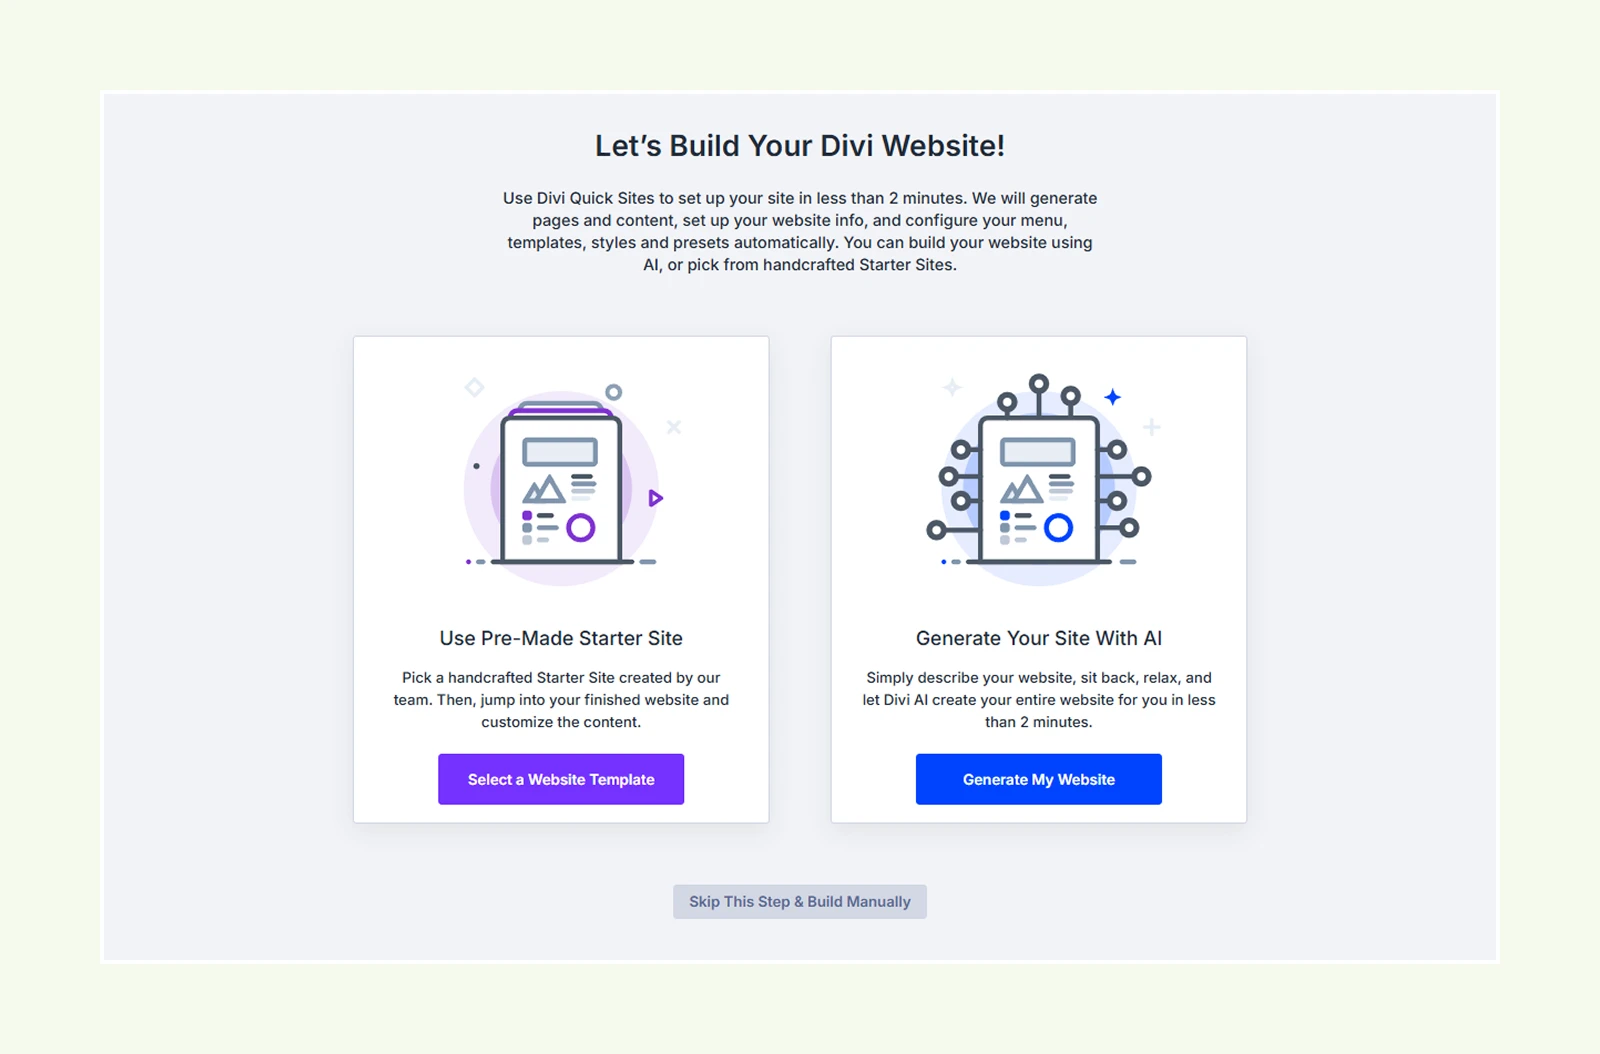
Note: If you already have a design in mind, building from scratch will give you complete control. Going with a template or Divi AI will leave you with extra sections and styling to remove or rework later.
And to configure the basic settings. To do that:
Go to Divi > Theme Options to add your logo and review the main site settings.
Right now, we do not need to fully design the website yet.
We will handle the store layout and WooCommerce pages in later steps.
Step 3: Install and Configure WooCommerce
Go to Plugins > Add New Plugin, search for WooCommerce, then click Install Now > Activate. Once activated, WooCommerce will open its setup wizard, where you can setup:
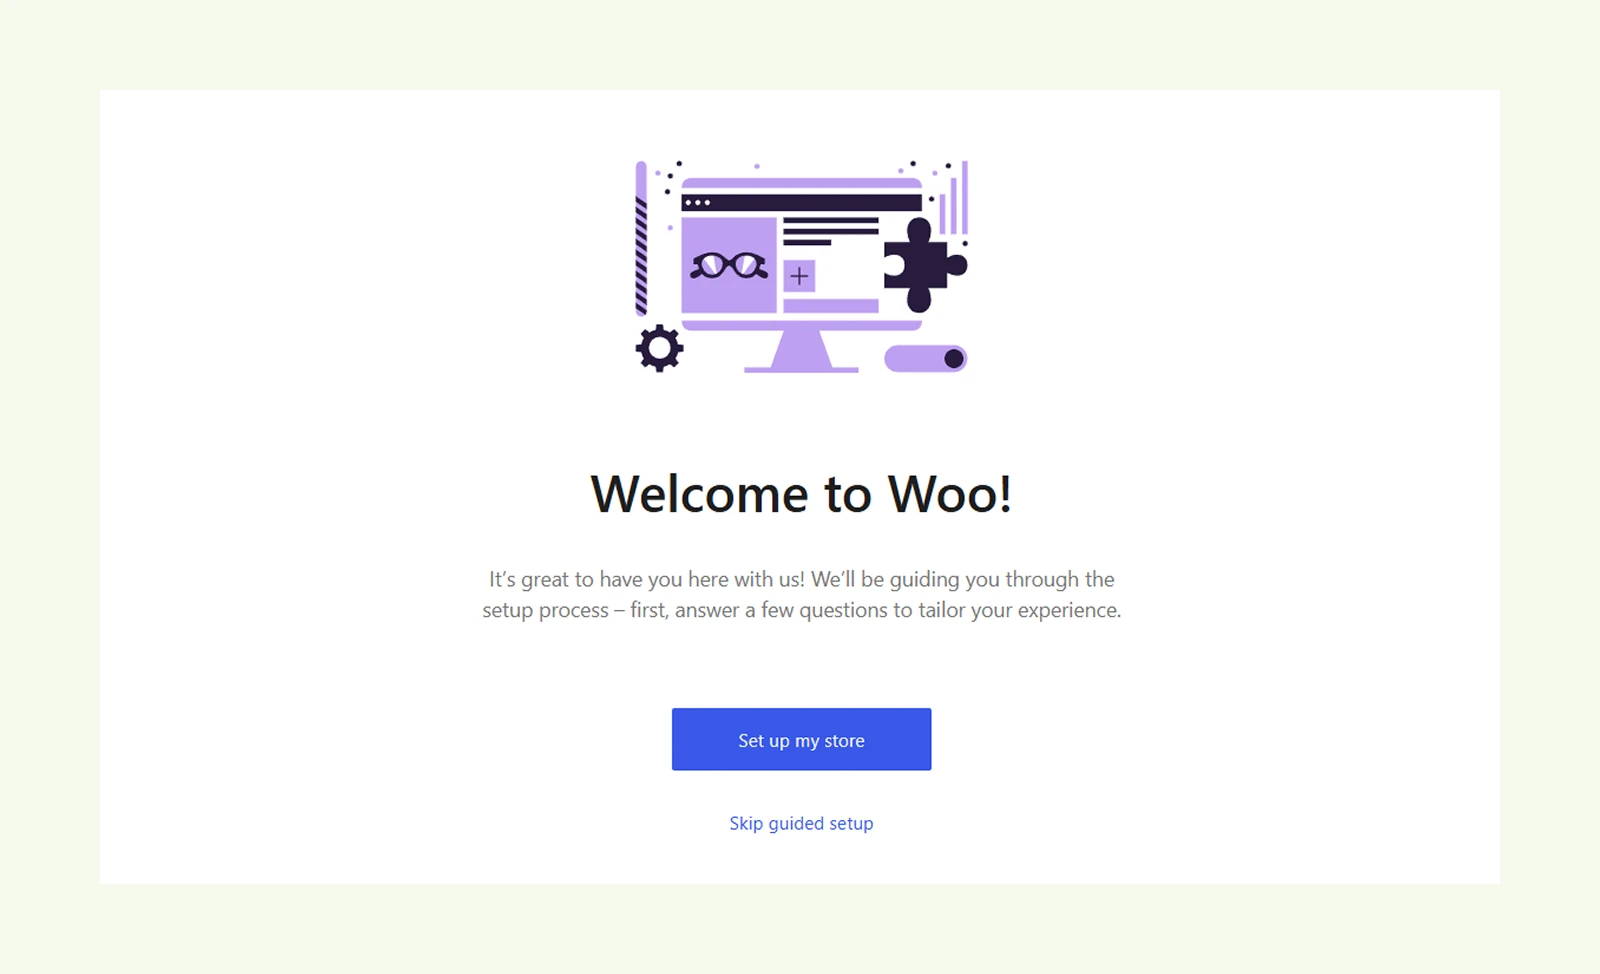
- Store location
- Industry
- Product type
- Business details
You can complete the relevant steps and skip anything you plan to configure later. After the setup wizard, review the most important WooCommerce settings before adding products, like:
Configure the General Store Settings
Navigate to to WooCommerce > Settings > General and set:
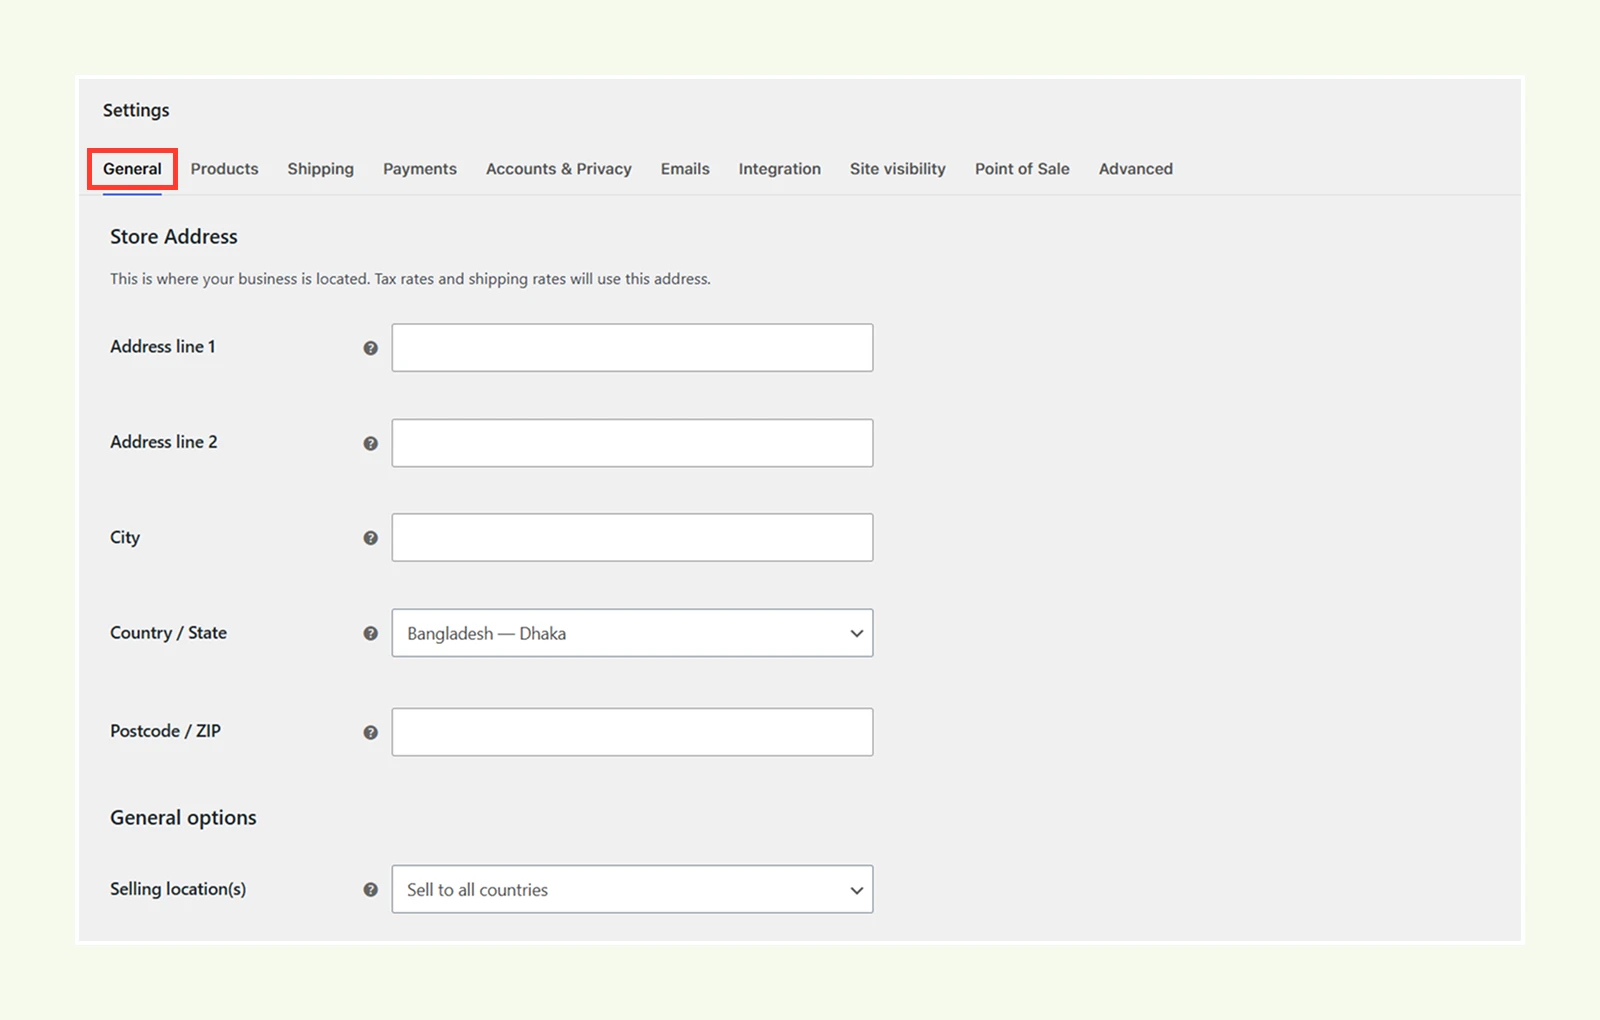
- Store address
- Selling locations
- Shipping locations
- Default customer location
- Currency
- Currency format
These settings determine where your store operates and how prices are displayed.
Practical Tip: Make sure your store location and currency are correct from the start, since WooCommerce uses them later for shipping, taxes, and payments.
Configure Product Settings
Next, go to: WooCommerce → Settings → Products → General and then review:
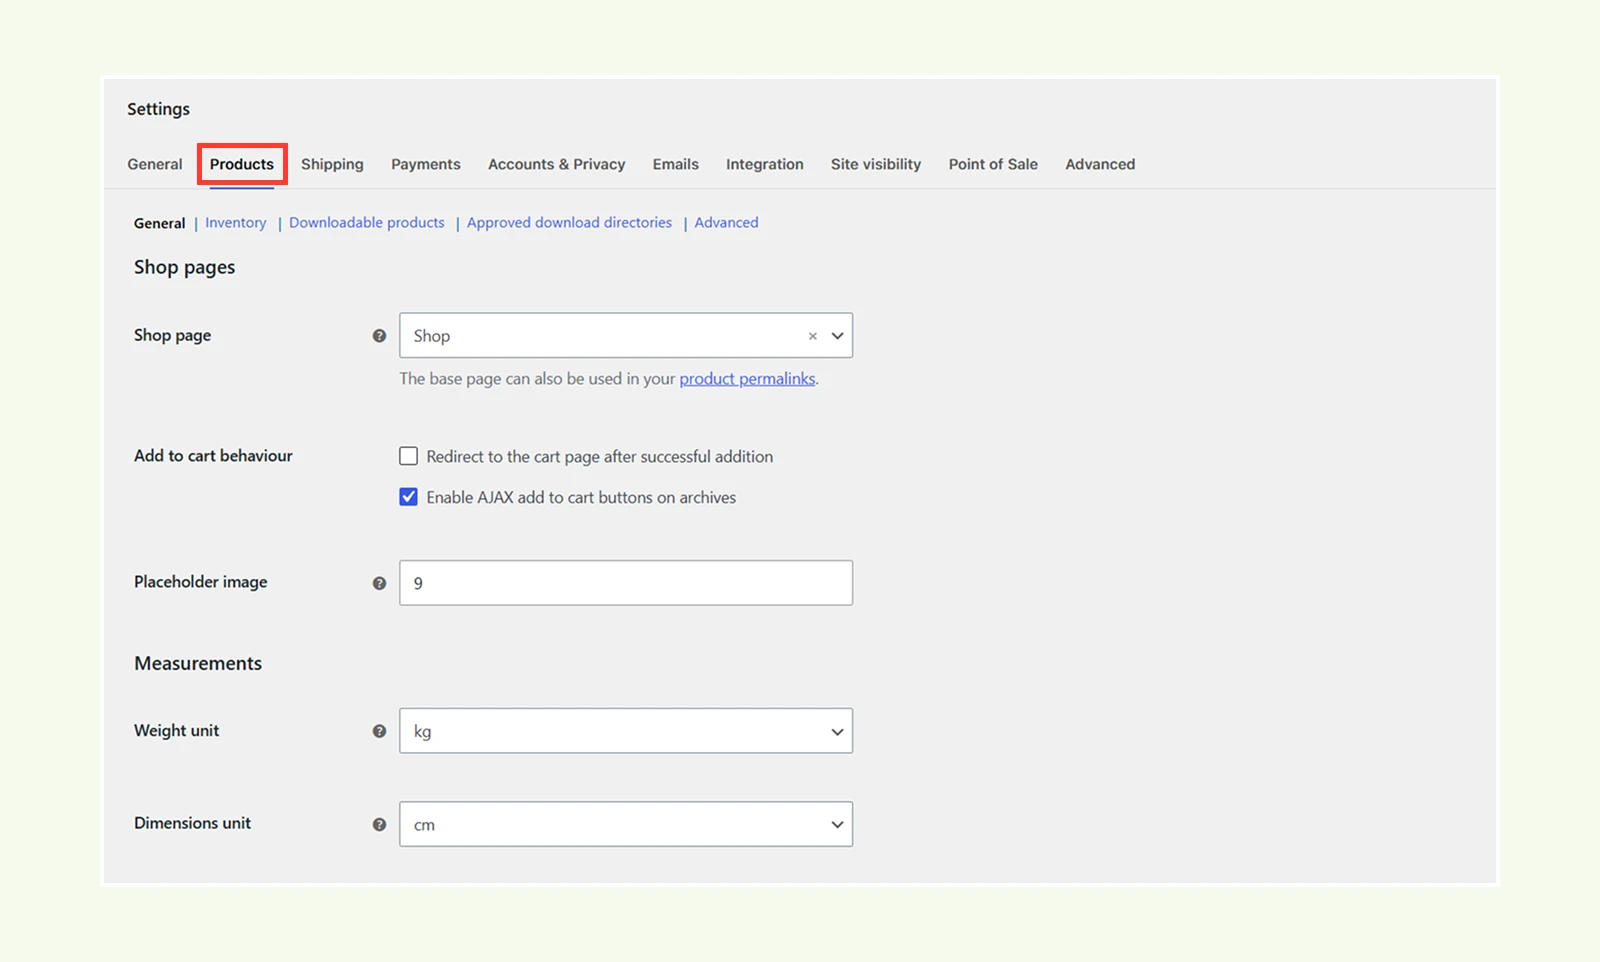
- Shop page
- Weight unit
- Dimension unit
- Product review settings
If you plan to track stock, also go to: WooCommerce > Settings > Products > Inventory. Here you can configure options such as:
- Stock management
- Low-stock notifications
- Out-of-stock behavior
You do not need to configure individual product inventory yet. We will do that when adding products.
Common Mistake: Double-check your weight and size units (e.g., lbs vs. kg). Choosing the wrong unit here will mess up your live shipping rate calculations later.
Set Up Customer Accounts
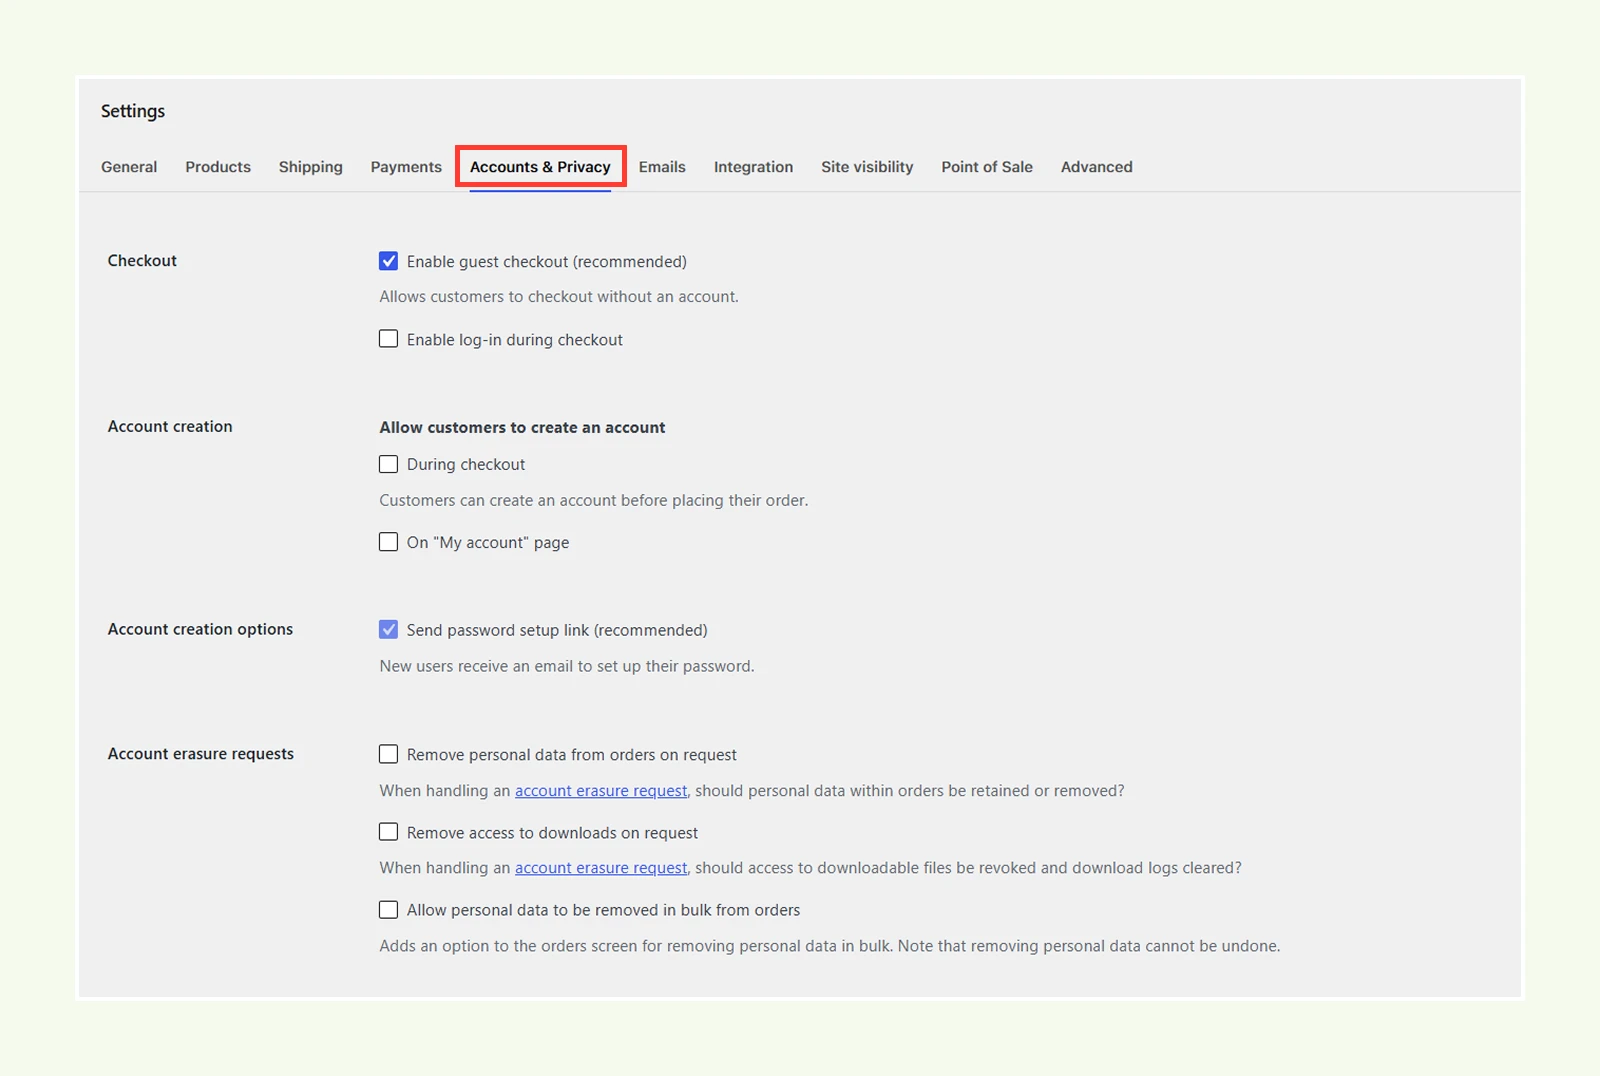
Go to: WooCommerce > Settings > Accounts & Privacy. From there, decide how customers can complete purchases and create accounts.
For example, you can choose whether to:
- Allow guest checkout
- Let customers log in during checkout
- Allow account creation during checkout
- Allow account creation from the My Account page
Check Your Store Emails
Finally, go to: WooCommerce > Settings > Emails and then make sure the below information is correct:
- Store name
- Sender email address
- Order notification recipients
You do not need to customize every email template yet. At this stage, just make sure WooCommerce can send the important order notifications to the right people.
We will configure products, payments, shipping, and taxes in the next steps.
Step 4: Add Your Products
Now, add a few products so you have real content to work with while designing the store. Try to include the main types of products you plan to sell, especially a variable product if you use options like size or color.
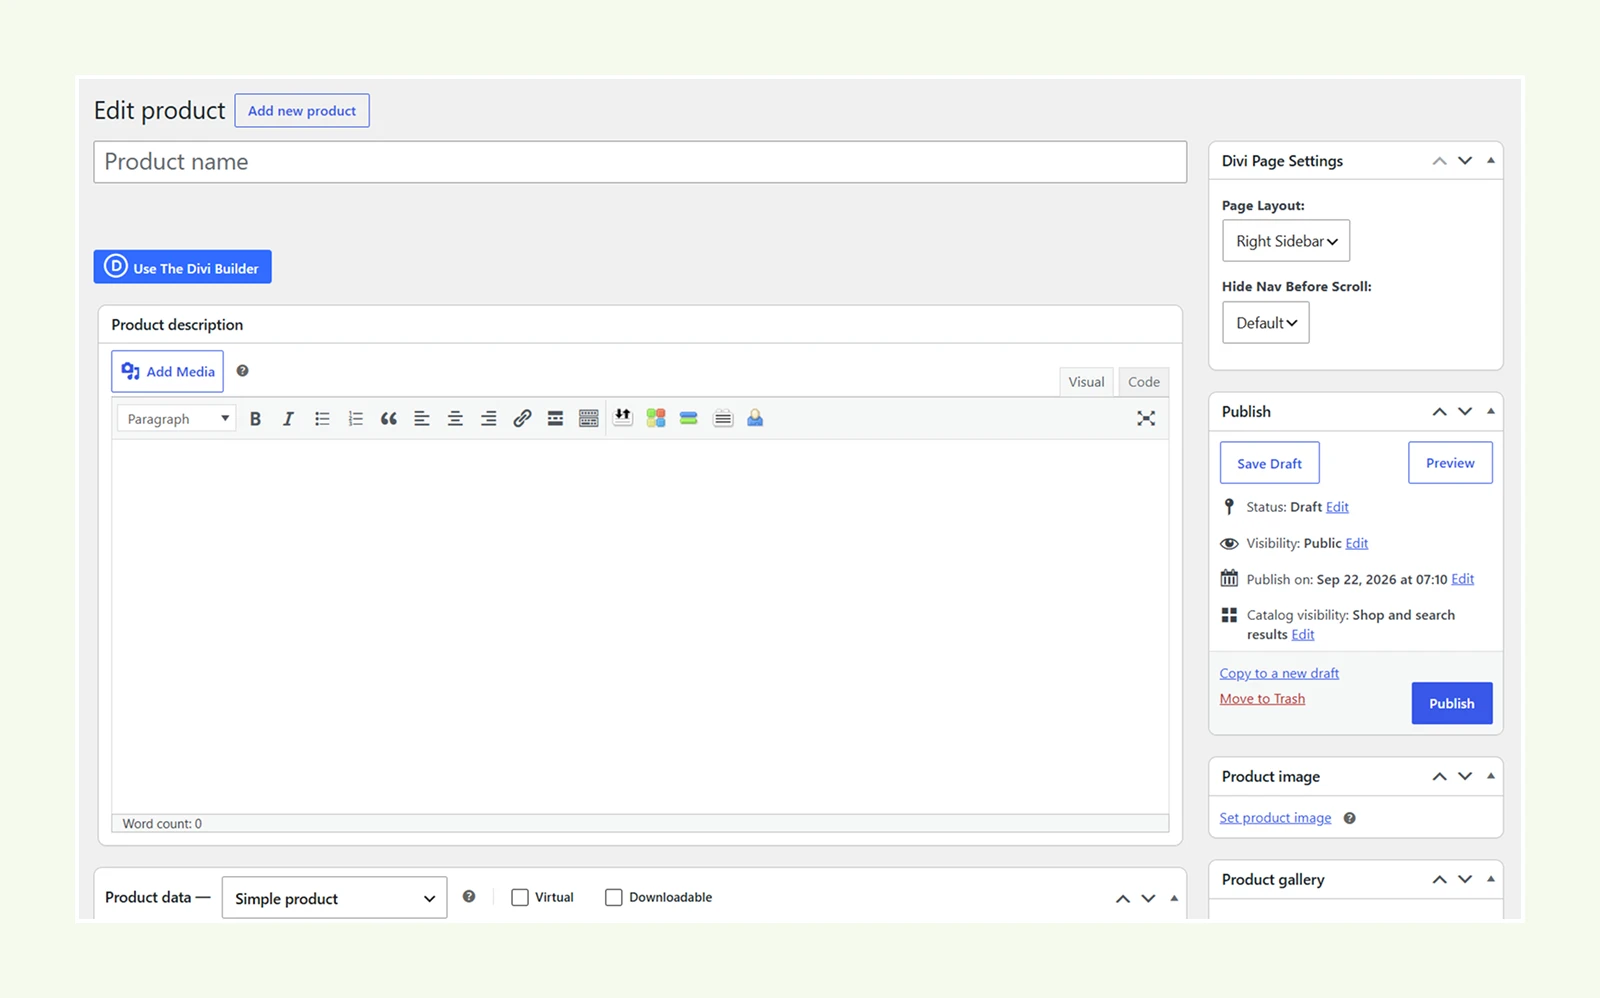
To add product, go to Products > Add New Product and enter the main product details, including:
- Product name
- Description
- Regular or sale price
- Product image and gallery
- Product category
- SKU and stock information, if needed
- Weight and dimensions for physical products
Once everything is ready, click Publish. Repeat for a few more products. You can view, edit, and manage all your added products from Products > All Products.
Speed Tip: Resize and compress product photos before uploading them. Large images are the #1 cause of slow WooCommerce sites.
Add Variations When Needed
If a product comes in different options, such as size or color, select Variable Product from the Product Data dropdown. This will keep all options under one product while letting you manage the price, stock, image, and other details for each variation separately.
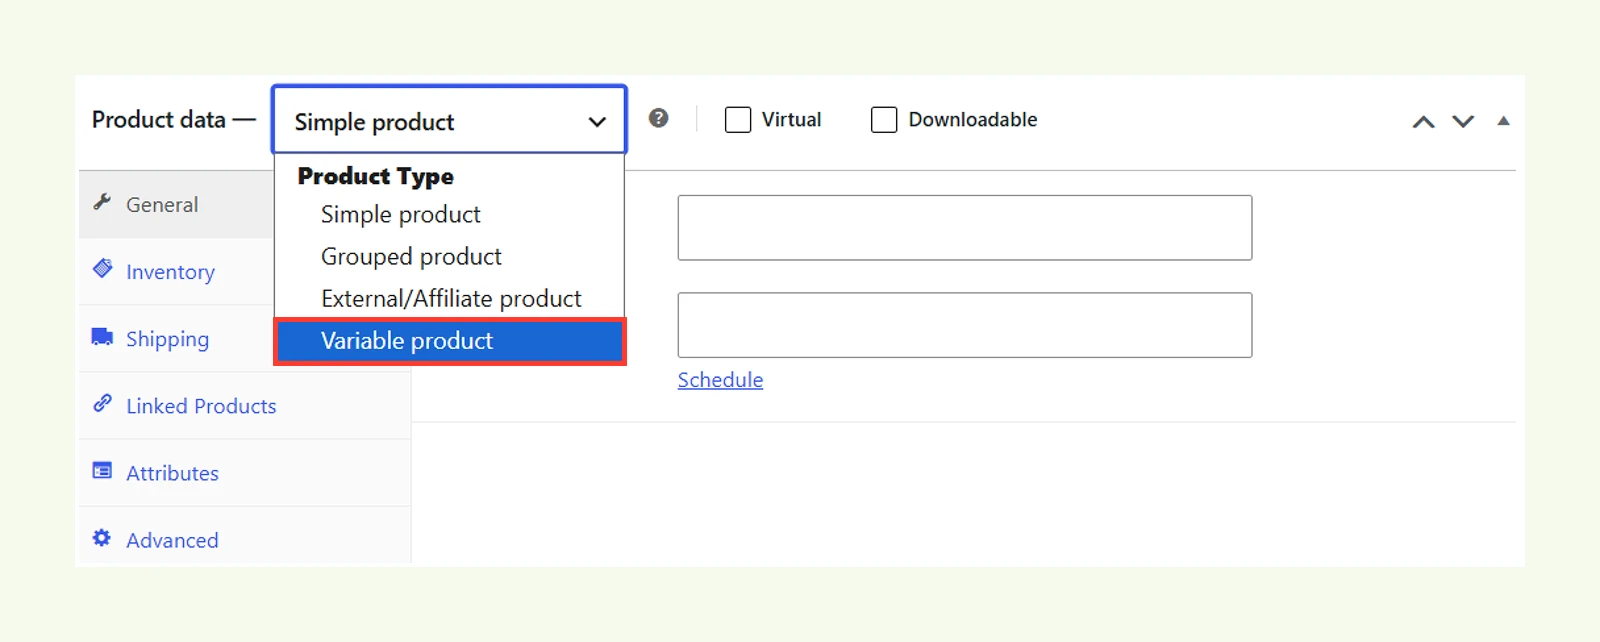
Then:
- Open the Attributes tab and add attributes such as Size or Color
- Enter the available values and enable Used for variations
- Open the Variations tab and generate the required variations, or add them manually
- Set the price, stock, SKU, image, and other details for each variation as needed
WooCommerce lets each variation have its own price, stock, image, and other details. Always set these carefully because missing or inconsistent variation data can make the product page confusing or cause options to behave incorrectly.
Organize Your Product Catalog
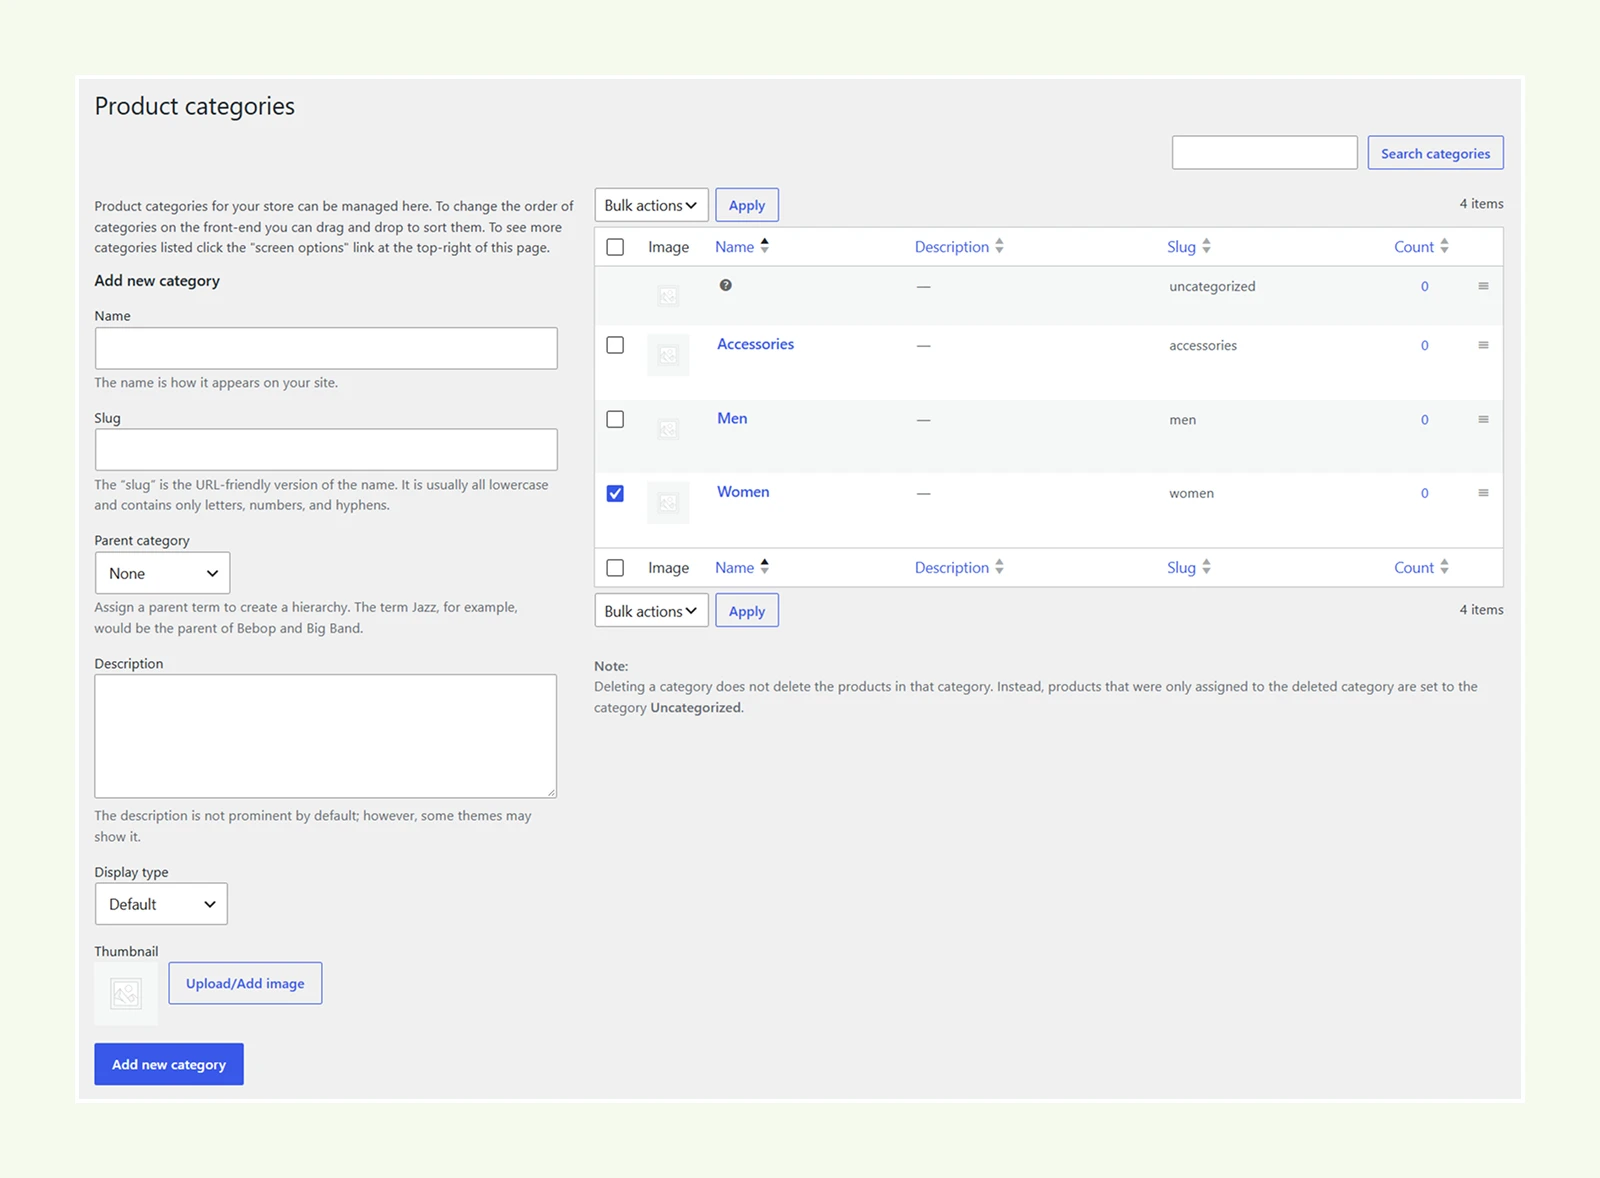
As you add products, keep the catalog structure simple and consistent from the start. Use Products > Categories to group similar products, such as Clothing > T-Shirts, so customers can browse the store more easily.
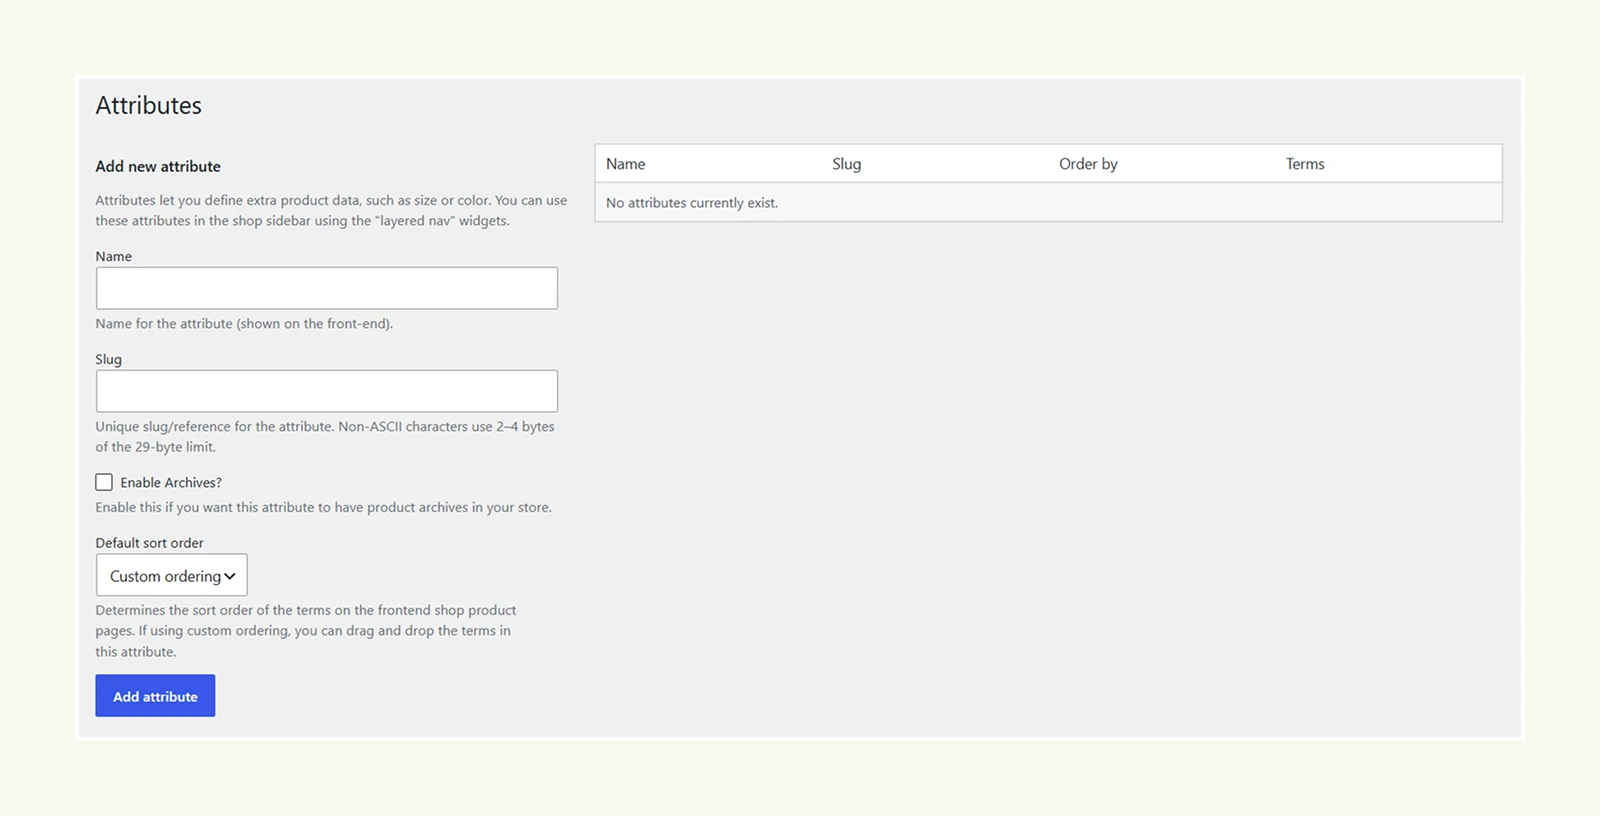
If several products use the same options, such as Size or Color, create them under Products > Attributes instead of adding them separately to each product. This keeps the options consistent and makes them easier to manage later.
You do not need to add your full catalog before designing the store. A few sample products are enough to test your layouts, especially if they cover the main product types and variations you plan to sell.
Step 5: Design Your Store with Divi
Now that you have a few products in place, you can start designing the store with the Divi Builder. Before working on individual WooCommerce pages, set the main design style first. This will save you from adjusting the same colors, fonts, buttons, and spacing on every page later.
Set Your Global Design Style
Decide on the colors, typography, buttons, and spacing you want to use across the store.
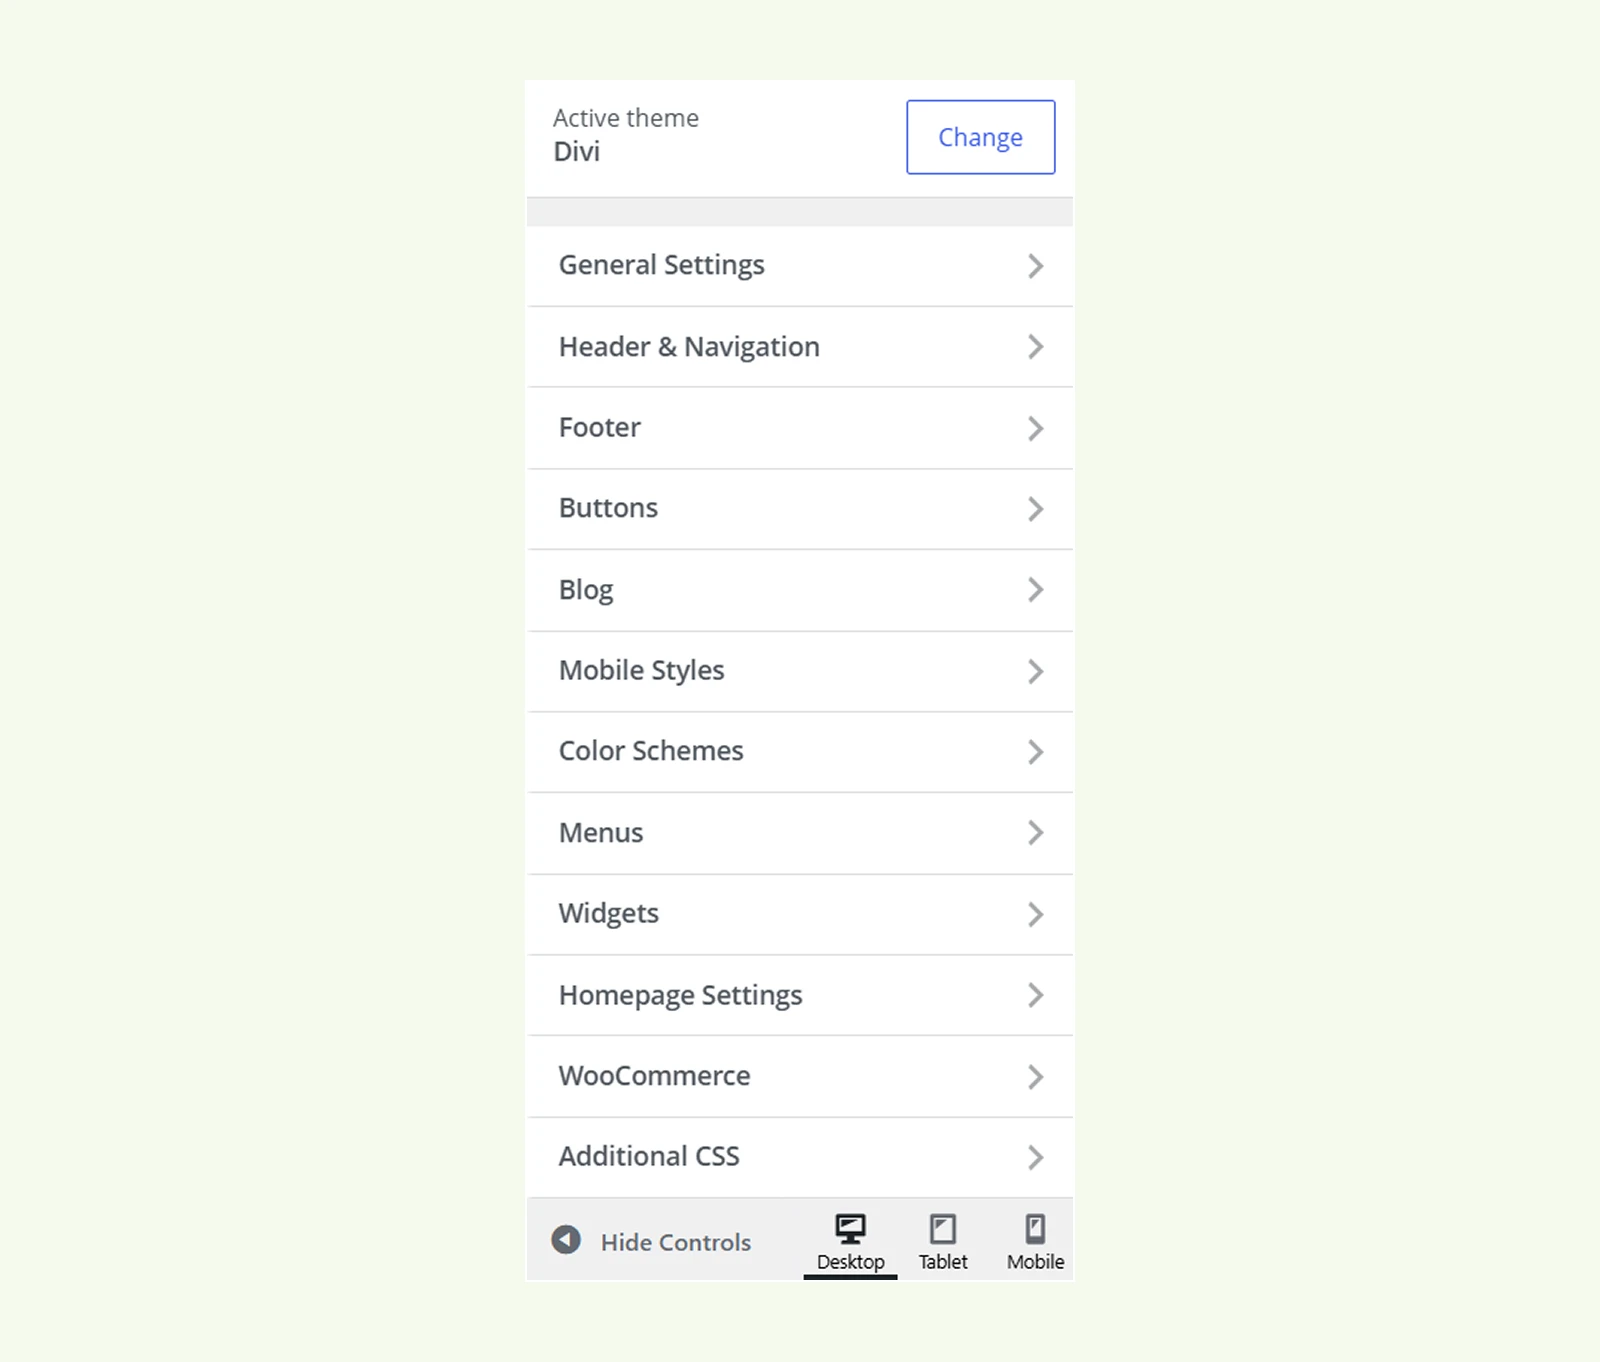
You can manage the basic site-wide styles from Divi > Theme Customizer. For more reusable control in Divi 5, use Design Variables and Presets inside the Visual Builder.
Practical Tip: Setting these first makes it much easier to keep your Shop, Product, Cart, and Checkout pages consistent as you build them.
Create Your Header and Footer
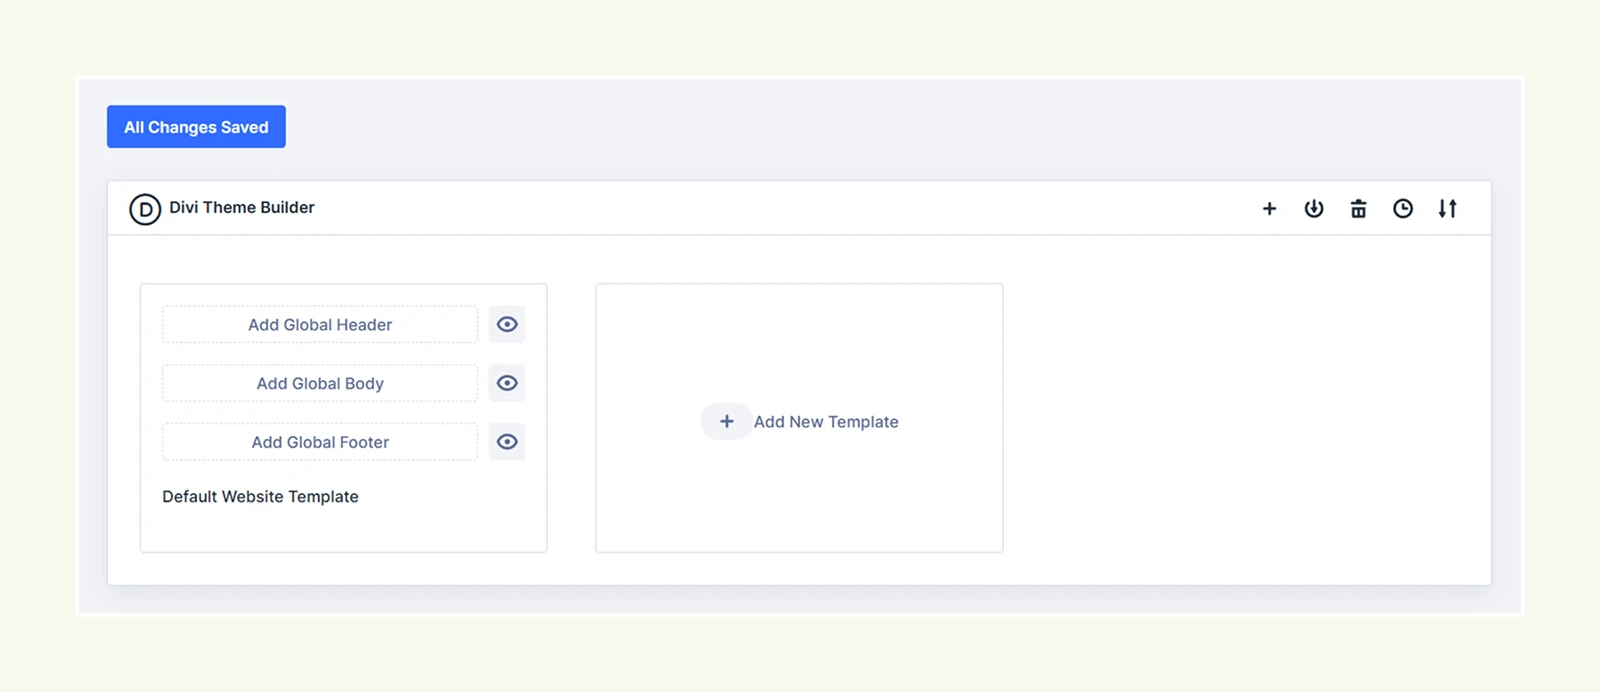
Go to Divi > Theme Builder and create a global header and footer. This will keep the navigation, brand style, and key link the same across the store. Also, setting them up early also helps avoid fixing the same design issue on different pages later.
Use Divi’s WooCommerce Modules
Divi 5 includes 25 WooCommerce modules that let you build product, cart, and checkout layouts visually. Instead of trying to use every module, add only the ones that help the customer understand the product and move through the buying process.
Here are the main modules to focus on:
| Page | Modules | What to focus on |
| Shop | Woo Products | Keep the product grid clear and easy to browse |
| Single Product | Product Images, Title, Price, Add to Cart, Description, Reviews, Related Products | Keep the main product detail and Add to Cart easy to find |
| Cart | Woo Cart Products, Cart Totals, Cross Sells | Make the product, quantity, total, and checkout action clear |
| Checkout | Woo Checkout Billing, Shipping, Details, Payment | Keep the form simple and the order total and Place Order button easy to see |
These modules cover the main shopping flow well. The gaps usually appear when you need more control over the product gallery, variation options, or other product-specific elements. That is where an extra plugin like DiviMerc can become useful.
Practical Tip: You can also use the Woo Products module on the homepage or other sections to dynamically show latest, featured, or sale products.
Add More Control to Your eCommerce Store (Optional)
Divi’s built-in WooCommerce modules are enough to build the main store pages and shopping flow. But if you need more control over product-specific elements like galleries, variation options, badges, size charts, or Add to Cart areas, you can extend Divi with a WooCommerce-focused plugin like DiviMerc.
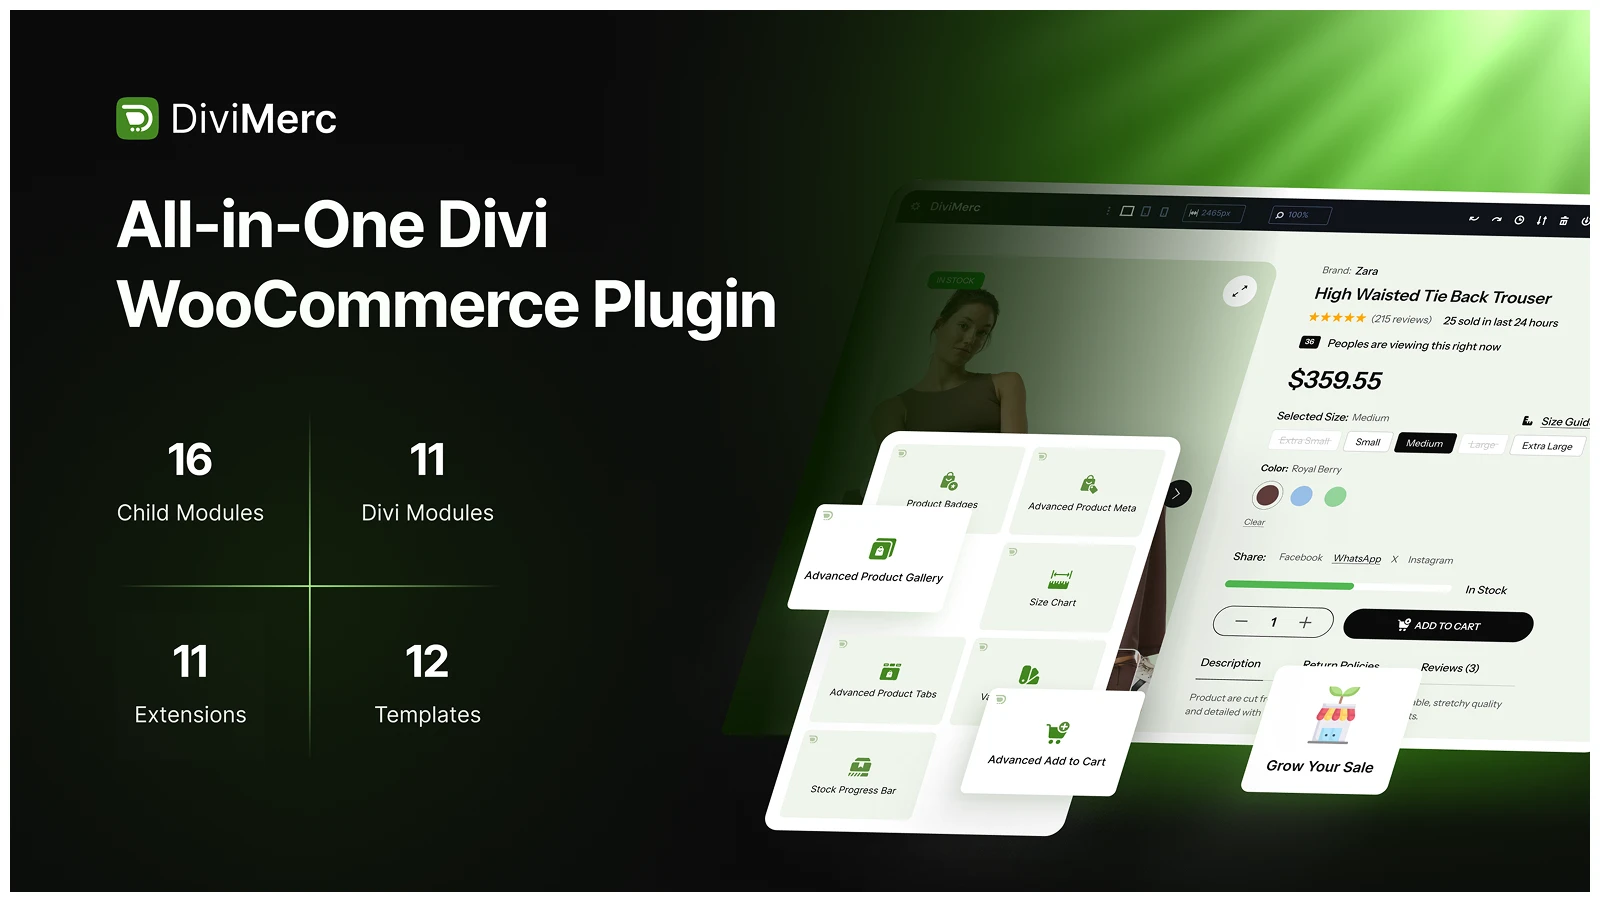
Its one of the best Divi plugins for WooCommerce and it includes features like:
- Advanced Product Gallery gives you more control over how product media is displayed, with grid, stacked, and thumbnail layouts plus zoom and lightbox options.
- Variation Swatches turn standard variation dropdowns into visual choices such as color, image, button, or radio-style options.
- Advanced Add to Cart gives you more control over the purchase area, including quantity, stock, variation options, and the Add to Cart button.
- Product Badges lets you highlight product status such as Sale, New, Best Seller, Low Stock, In Stock, or Out of Stock.
- Advanced Product Meta gives you more control over details like SKU, category, brand, weight, dimensions, rating, and stock status.
- Size Chart lets you add sizing information directly to the product page using inline, popup, drawer, or accordion layouts.
Use Theme Builder for Product and Category Templates
If most of your products use the same layout, use the Divi Theme Builder to create one reusable template instead of designing each product page separately. You can then customize the layout with the Divi Builder and WooCommerce modules. This will keep the layout consistent and make future updates much easier.
For product pages:
- Go to Divi > Theme Builder > Add New Template.
- Assign it to All Products.
- Click Add Custom Body > Build Custom Body.
- Build the layout with WooCommerce modules such as Product Images, Title, Price, Add to Cart, Description, Reviews, and Related Products.
- Save the template.
Divi will use the same layout for every assigned product while pulling in the correct product data automatically.
For product category pages:
- Add another template in Divi > Theme Builder.
- Assign it to All Product Category Pages or only the categories that need it.
- Click Add Custom Body > Build Custom Body.
- Use the Loop Builder to create the product grid with dynamic WooCommerce data.
- Save the template.
For most stores, one product template and one category template are enough to start. Create separate templates only when a product type or category really needs a different layout. This keeps the store easier to manage as the catalog grows.
Step 6: Create the Essential Store Pages
Your Shop, Product, Cart, and Checkout pages handle the buying process, but customers will usually look for a few other pages before they feel comfortable placing an order.
Create the main supporting pages your store needs:
- Homepage: Make it clear what you sell and give visitors an easy way to reach your main products or categories.
- About Page: Explain who is behind the store and include any details that help build trust.
- Contact Page: Give customers a simple way to reach you when they have a question or problem.
- Privacy Policy: Explain what customer data you collect and how you use it.
- Shipping & Return Policy: Clearly cover delivery areas, shipping time, cost, return conditions, and refunds.
- Terms and Conditions: Set out the basic rules for purchases, payment, cancellation, and use of the store.
- My Account: Make sure customers can easily view orders, manage account details, and access downloads or other account information when relevant.
Keep these pages easy to find, especially your contact, shipping, return, privacy, and terms pages. Customers often check them before buying, so hiding them deep in the site can create unnecessary doubt.
Build these pages with Divi and keep the typography, colors, header, and footer consistent across your entire Divi website.
Step 7: Set Up Payments, Shipping, and Taxes
With the store design ready, configure how customers will pay, receive their orders, and be charged tax.
Set Up Payment Methods
Go to WooCommerce > Settings > Payments and enable the payment methods you want to offer. Depending on your store and location, this may include:
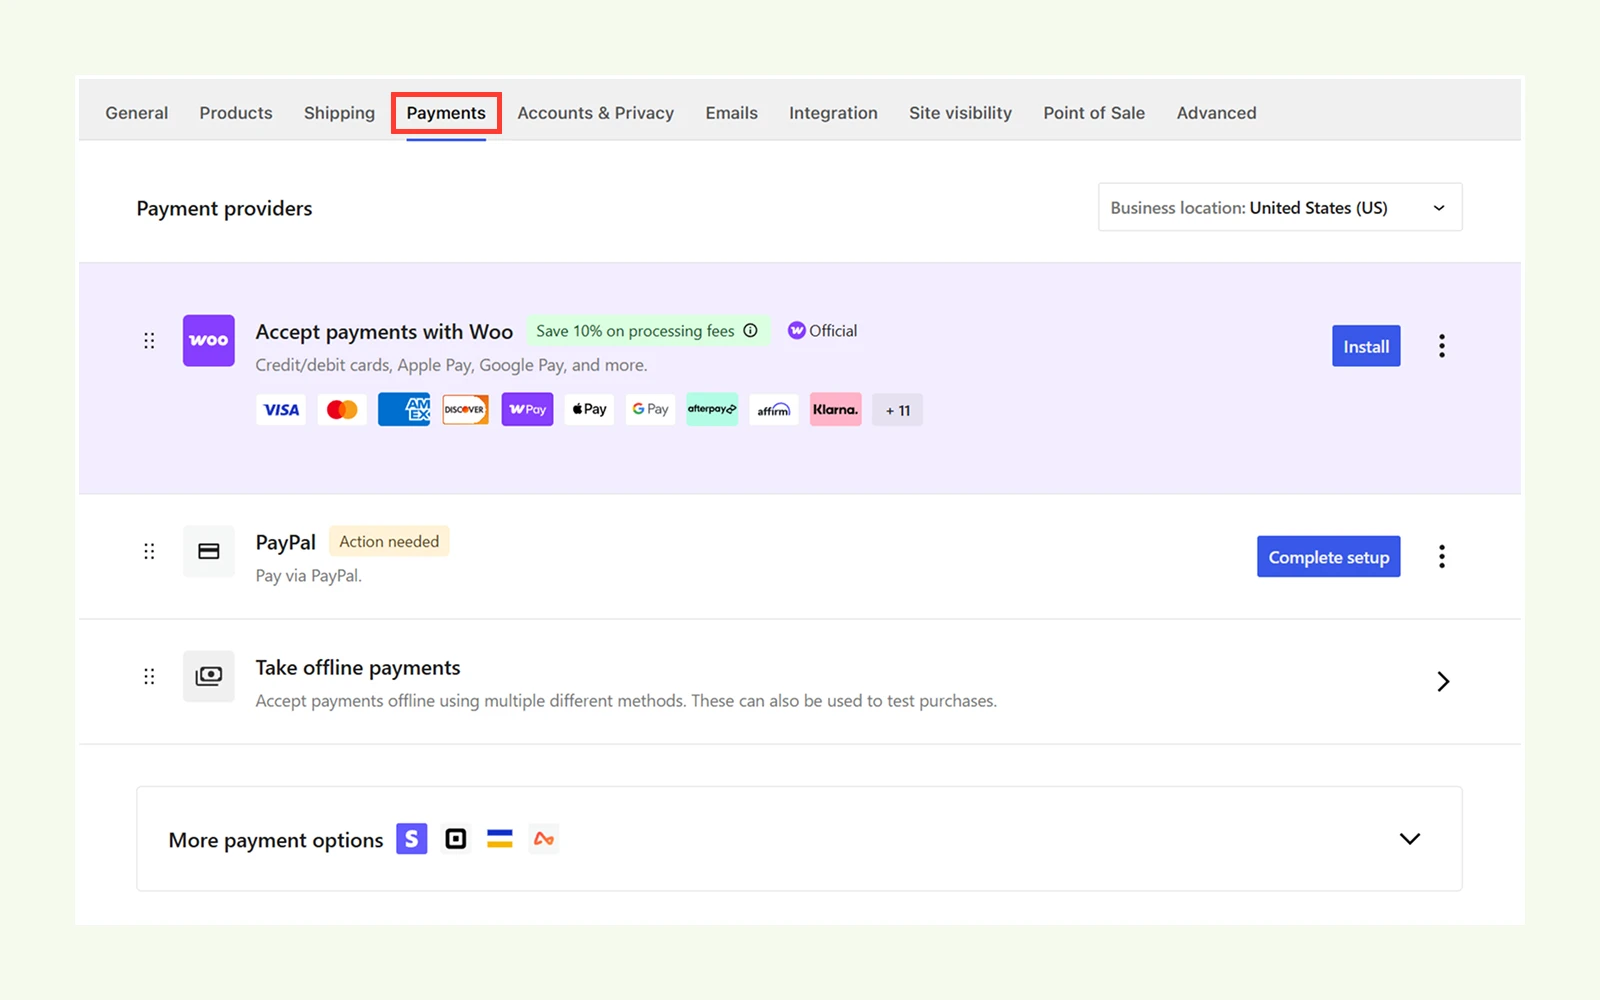
- Credit or debit cards
- WooPayments, Stripe, or PayPal
- Direct bank transfer
- Cash on delivery
Open each enabled method and complete its required account, API, or business details.
If the gateway provides a test or sandbox mode, keep it enabled until you successfully place a test order. Switch to live mode only when the store is ready to launch.
Payment Tip: Offer payment methods your customers prefer. More payment choices can reduce checkout friction and improve the buying experience. See our eCommerce statistics for the latest payment trends.
Configure Shipping
If you sell physical products, go to: WooCommerce > Settings > Shipping > Shipping Zones
Create zones based on where you deliver, then add the shipping methods available in each zone.
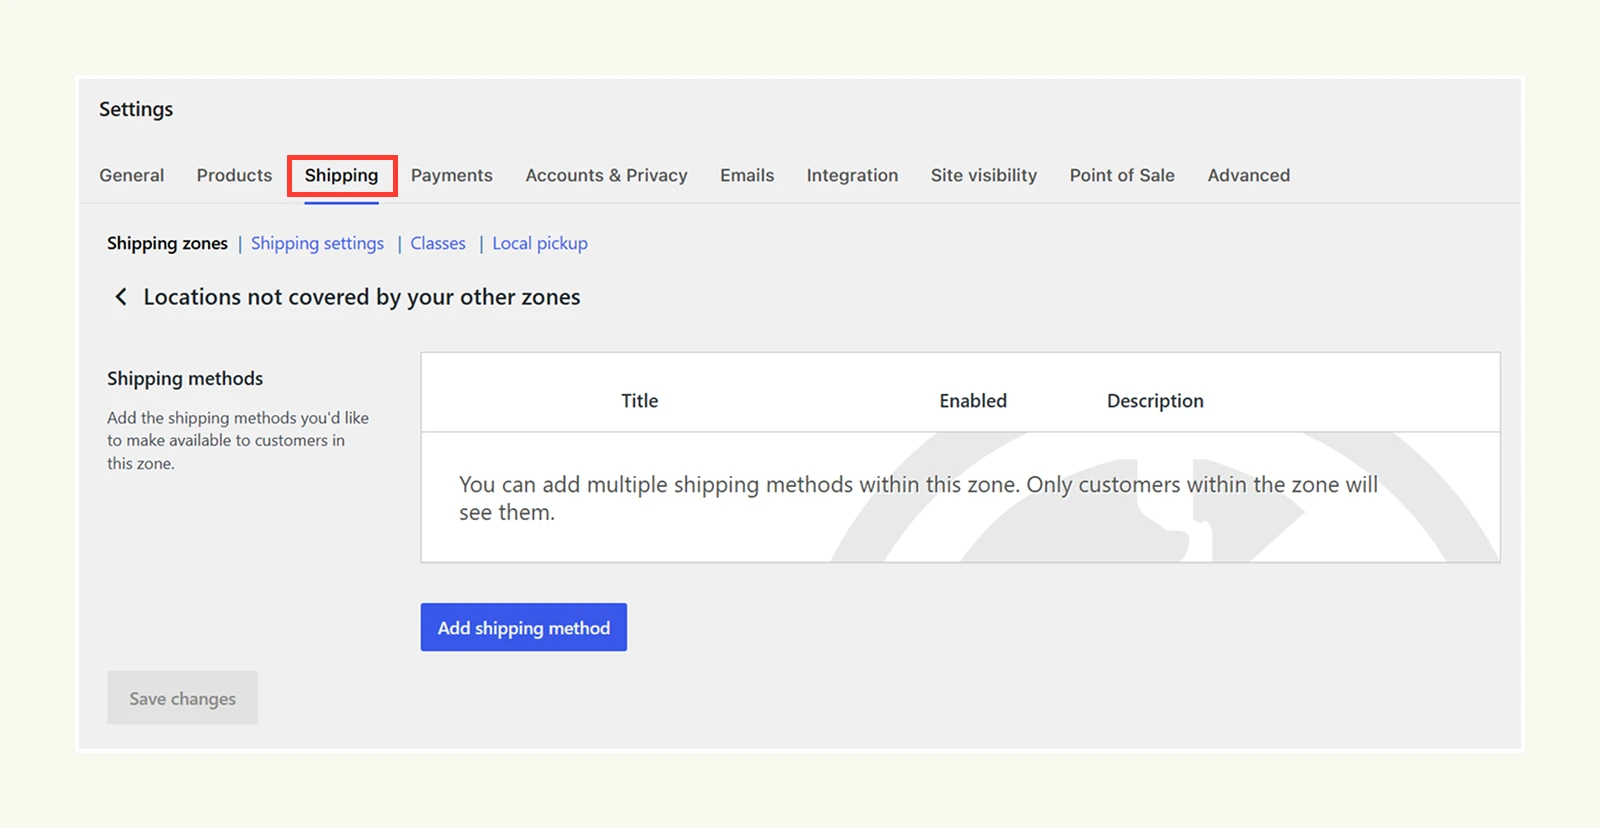
For example:
- Flat Rate - charge a fixed shipping amount
- Free Shipping - offer free delivery when specified conditions are met
- Local Pickup - let customers collect orders themselves
Arrange zones from the most specific location to the broadest, because WooCommerce uses the first zone that matches the customer's shipping address.
If you sell only virtual or downloadable products, you may not need shipping configuration.
Configure Taxes
If your business needs to collect tax, go to: WooCommerce > Settings > General, enable Tax rates and calculations. Then open: WooCommerce > Settings > Tax
From there, configure:
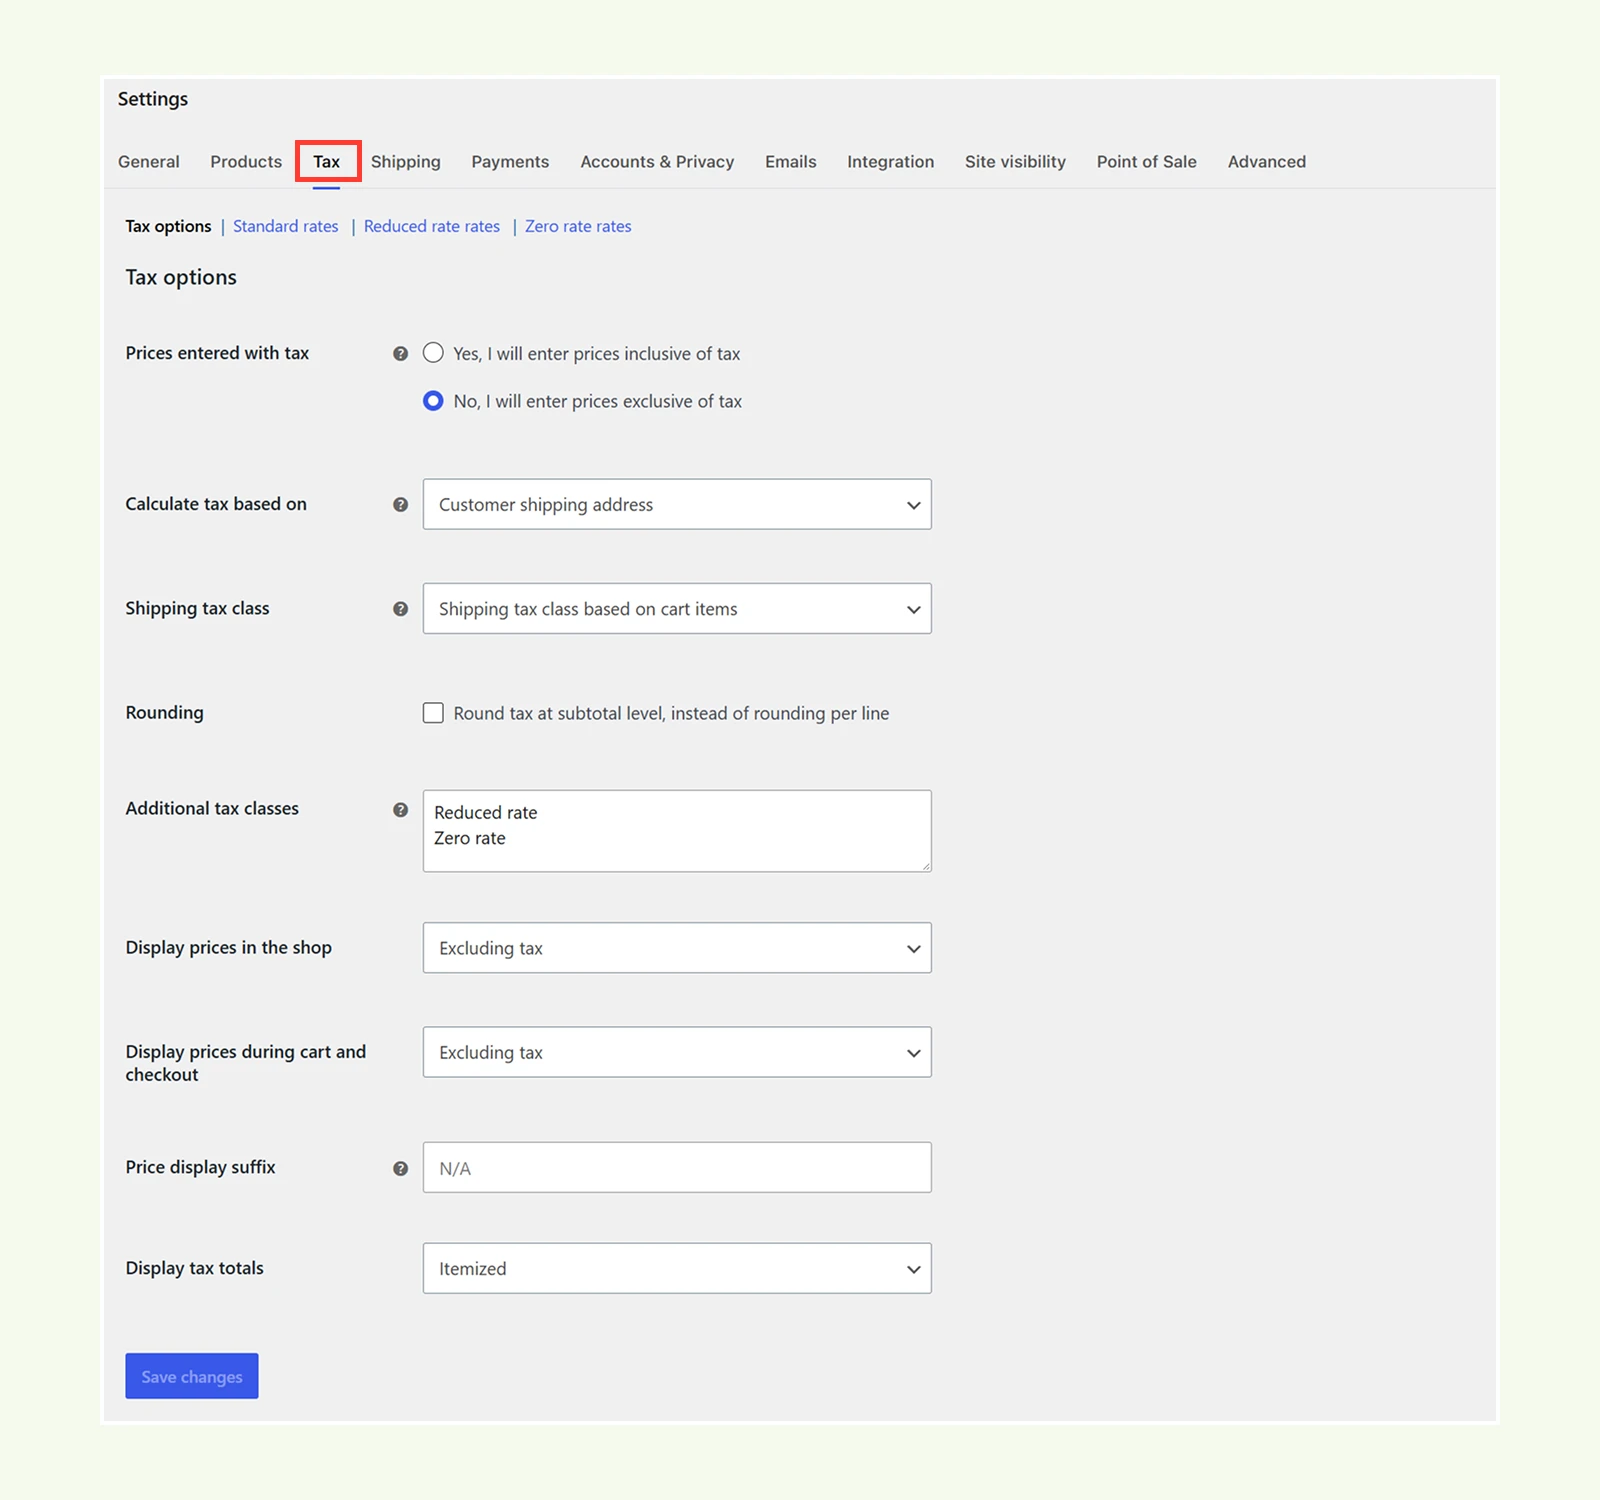
- Whether product prices include or exclude tax
- Which customer address is used for tax calculation
- Standard and additional tax rates
- How taxes appear in the cart and checkout
You can enter rates manually or use a supported automated tax service.
WooCommerce handles the calculation, but the tax rates and rules you need to apply depend on your business location and where you sell.
Step 8: Test and Launch Your eCommerce Site
Before launching your eCommerce site, here are a few final checks to make sure the store works properly, loads well, and is ready for real customers.
Test the Store
Try to check these:
- Products and variations can be selected correctly
- Add to Cart and quantity controls work
- Cart totals are correct
- Shipping methods appear correctly
- Taxes are calculated correctly
- Checkout fields work
- Test payment completes successfully
- The order appears under WooCommerce > Orders
- Stock updates correctly
- Customer and admin order emails are sent
Also repeat the full buying process on a real phone. A layout that looks fine inside the builder can still have spacing, button, or text issues on a smaller screen.
Optimize Performance, SEO, and the Buying Experience
Before going live, give the store one final optimization pass:
- Compress and properly size product images, then test important pages with PageSpeed Insights or a similar tool.
- Set up caching and confirm that Cart, Checkout, and My Account are excluded because these pages contain customer-specific data.
- Add clear product titles, descriptions, image alt text, and clean URLs.
- Make sure important product and category pages are linked through your navigation.
- Check that product pages can be indexed and that valid Product structured data is present.
- Keep the price, Add to Cart button, shipping information, and return details easy to find.
You do not need to perfect everything before launch. Fix anything that affects speed, product discovery, or the buying process first, then improve the rest as the store grows.
Note: For a more detailed look at optimizing your store for search engines, see our complete WooCommerce SEO guide.
Final Launch Check
Before going live, confirm that:
- Payment gateways are switched from test to live mode
- SSL/HTTPS is active
- Shipping and tax settings are correct
- Contact and policy pages are published
- Backups are enabled
- Analytics is connected
- Search engines can index the site
- Important forms and links work
Once everything passes, disable Coming Soon or maintenance mode and launch your store.
How Much Does It Cost and How Long Does It Take to Make a Divi WooCommerce Store?
A basic DIY Divi WooCommerce store typically takes 1 - 3 days to set up and costs around $150 - $500+ in the first year, depending on hosting, Divi, your domain, and any extra plugins or services.
| Phase | Time | Typical Cost |
| Domain | 10 minutes | $10 - $20/year |
| Hosting | 20 minutes | $5 - $30/month |
| WordPress install | 5 minutes | Free |
| Divi license | 5 minutes | $89/year or $249 lifetime |
| WooCommerce setup | 30 - 60 minutes | Free |
| Product entry (10 - 20 products) | 2 - 4 hours | No additional cost |
| Design & customization | 4 - 8 hours | Depends on optional plugins or services |
| Payment/shipping/tax setup | 1 - 2 hours | Gateway fees only (no flat cost) |
| Testing & launch | 1 - 2 hours | No additional cost |
Note: Want a more detailed cost breakdown? See our complete eCommerce website cost guide for platform, hosting, plugin, payment, and ongoing expenses.
FAQ on Creating an Ecommerce Website
Do I need WooCommerce if I use Divi for an eCommerce website?
Yes. To make an eCommerce website with Divi, you need WooCommerce to handle products, inventory, payments, shipping, taxes, customers, and orders. Divi is then used to design and customize how those store elements look on your website.
How Divi and WooCommerce Work Together?
WooCommerce handles the e-commerce backend, managing products, inventory, cart, checkout, payments, and orders. Divi handles the design, letting you visually customize those same pages using its Visual Builder and WooCommerce modules.
Can I build a complete WooCommerce store with Divi without coding?
Yes. You can build a complete WooCommerce store with Divi without coding. Divi 5 provides WooCommerce modules for product, cart, and checkout layouts, while WooCommerce handles the store functionality you need to start an online store.
Can I sell digital or downloadable products with this setup?
Yes. WooCommerce supports virtual and downloadable products, so you can sell files without shipping and deliver downloads through the order page, email, or customer account.
Is a Divi + WooCommerce checkout PCI compliant?
PCI compliance depends on your full payment setup, not Divi alone. Using a compliant payment gateway such as Stripe, PayPal, or WooPayments can reduce your PCI responsibilities, but the store owner is still responsible for meeting the applicable PCI requirements.
Do I need a separate WooCommerce builder plugin with Divi?
No. Divi can handle product, cart, checkout, and archive layouts, so you do not need a separate builder plugin to start an online store. However, you can use a WooCommerce plugin like DiviMerc if you need more advanced store features or customization.
Should I design every WooCommerce product page separately in Divi?
Usually, no. If your products share the same layout, create one All Products template in Divi > Theme Builder. Divi will reuse that design while automatically displaying the correct product data on each page.
Can I use different Divi layouts for different product categories?
Yes. Divi Theme Builder lets you assign templates to all product category pages or only selected categories, so different parts of your catalog can use different layouts when needed.
Can Divi customize the WooCommerce cart and checkout pages?
Yes. Divi 5 includes dedicated modules for cart products, cart totals, cross-sells, billing, shipping, order details, and payment, which can be arranged and styled inside the Visual Builder or Theme Builder.
How many products should I add before designing my store?
You do not need your full catalog. Add a few representative products with realistic titles, images, prices, and descriptions. If your store uses variations, include at least one variable product so you can properly design and test those controls.
How do I know my Divi WooCommerce store is ready to launch?
Place a complete test order and verify that product selection, cart totals, shipping, tax, checkout, payment, stock updates, order creation, and emails all work correctly.
Final Thoughts
Now you know how to build an eCommerce website with Divi & WooCommerce. From setting up the foundation to designing the store and preparing it for real customers, we include everything you need.
Start with a solid setup, configure WooCommerce correctly, add your products, and then use Divi to shape the shopping experience. After that, connect payments, shipping, and taxes, and test the full customer journey before launch.
The goal is not to make every part perfect on day one. Focus first on making your store easy to browse, easy to buy from, and reliable across desktop and mobile.
Once everything works as expected, you can launch with confidence and continue improving your store as your products, traffic, and customer needs grow.



0 Comments